Saturday, 19 December 2009

Lacy Spring Mitts Pattern

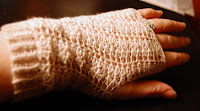
I wanted to design some ladylike, lacy gloves that would still be warm for springtime weather. Since it's currently snowing here, it's unlikely that I'll be wearing these anytime soon but here's the pattern anyway!

Lacy Spring Mitts


3mm hook
Fingering/4ply yarn.

I used a 3mm hook and a cashmere/wool mix yarn (ColourMart 2/15NM in Natural). It's lovely and warm but very soft.

Note: this pattern uses US terminology.

Pattern

Cuff:
ch9
Row 1: sc in 2nd ch from hook, sc across - 8 sc
Row 2-37: ch1, sc in blo of each sc across - 8 sc
Do not fasten off
Turn cuff so that short ends are together. Sl st up row ends to join sides of cuff together. Turn right side out.
Do not fasten off.
Mitten:
Row 1: Working in ends of rows, ch1, sc around, sl st in first st to join - 37 sc
Row 2: ch1 (counts as first sc throughout), *sk next 2 sc, 5 dc in next sc (shell made), sk next 2 sc*, rep from *to* around, sl st in first st to join - 8 shells
Row 3-17: ch1, *sk next 2 sts, shell in next st (third dc of shell in previous row), sk 2 sts, sc in sc*, rep from * to * around, sl st in first st to join - 8 shells
Row 18: ch1, sk next 2 sts, shell in next st (third dc of shell in previous row), sk 2 sts, sc in sc, sk next 2 sts, shell in next st, sk next 2 sts, sc in sc, ch6, sk next 8 sts, 5 dc in centre of next shell, *sk next 2 sts, sc in sc, sk next 2 sts, shell in next st* rep from * to * around ending with shell, sl st in first st to join - 7 shells
Row 19: ch1, sk next 2 sts, shell in next st (third dc of shell in previous row), sk 2 sts, sc in sc, sk next 2 sts, shell in next st, sk next 2 sts, sc in sc, sk next 2 ch, shell in next ch, sk next 2 ch, sc in next ch, sk next 2 sts, *shell in next st, sk next 2 sts, sc in sc, sk next 2 sts*, rep from * to * around, sl st in first st to join - 8 shells
Row 20-24: ch1, *sk next 2 sts, shell in next st (third dc of shell in previous row), sk 2 sts, sc in sc*, rep from * to * around, sl st in first st to join - 8 shells
Row 25-26: ch1, sc around, sl st in first st to join - 45 sc
Fasten off.
To finish, join yarn in any st at bottom of mitten.
ch1, sc evenly around, sl st in first st to join.
Fasten off.
Weave in ends and block to desired measurements.

Sunday, 13 December 2009

My pledge

I've discovered that Manchester offers some of the most amazing vintage clothing shops I've ever seen. I know, this revelation has come a little late since I've lived here almost three years now, but better late than never I say! Manchester's Northern Quarter has a wealth of vintage delights but my favourites are Oxfam Originals, Rags to Bitches (which also offers dressmaking classes), Pop and Best Vintage.

We've had a vintage shopping bonanza recently, first with some visiting friends when I bought an orange knitted hat for £4 and 50s sewing patterns, and Mr NLTP got a fab houndstooth peacoat for £30 - and then with my parents this weekend where I tried and failed to buy 1940s tweed pencil skirts but ended up with a 40s-style wool jacket.

I have a strong theory that vintage clothes, particularly from the 40s, are much more flattering to my hourglass figure than modern clothes. Also, let's face it - they're just cooler. So I've decided to make myself a pledge: for the next six months, I will buy clothes only from vintage clothing shops or I will sew them myself (with the exceptions of basics e.g. tshirts and underwear!). I even shook on it with Mr NLTP, so you know I'm serious.

Let's see how I get on - I'll post pictures as I go!

Friday, 4 December 2009

Alice Mitts Pattern

Since making these up a couple of weeks ago, I've been working on the pattern and having it tested. It might not be quite there but the pattern is below, let me know if you find any errors!

Alice-Inspired Mitts
4mm (G) hook
Worsted-weight yarn

I used a 4mm hook and the New Moon colourway yarn from Bristol County Dyeworks. It's a great, soft worsted yarn. My hands are slim but I've received some comments that the mitts are coming out too big. If this is the case, I'd recommend going down to a 3.5mm hook.

Note: this pattern uses US terminology.
 
Gauge
5 hdc per inch
3 rows per inch
 

Pattern
ch32, join with sl st in 1st ch, ensuring that chain is not twisted.

row 1: ch3 (counts as first dc), dc around, join with sl st in first st – 32 sts

row 2-4: ch3 (counts as first dc), dc in next 3 sts, fpdc in next 4 sts, *dc in next 4 sts, fpdc in next 4 sts*, rep from * to * around, ending with fpdc in last 4 sts. Join with sl st in first st. - 32 sts – 2 pattern repeats

row 5: ch3 (counts as first dc), dc2tog over next 2 sts, dc in next st *fpdc in next 4 sts, dc in next 4 sts, fpdc in next 4 sts, dc in next st, dc2tog over next 2 sts*, rep from * to * around, ending with fpdc in next 4 sts. Join with sl st in first st. - 30 sts – 2 pattern repeats

row 6: ch3 (counts as first dc), dc in next 2 sts, *fpdc in next 4 sts, dc in next st, dc2tog in next 2 sts, dc in next st, fpdc in next 4 sts, dc in next 3 sts*, rep from * to * around, ending with fpdc in last 4 sts. Join with sl st in first st. - 28 sts, 2 pattern repeats

row 7: ch3 (counts as first dc), dc 2tog over next 2 sts, fpdc in next 4 sts, *dc in next 3 sts, fpdc in next 4 sts, dc2tog over next 2 sts, fpdc in next 4 sts*, rep from * to * around, ending with fpdc in last 4 sts. Join with sl st in first st. - 26 sts, 2 pattern repeats

row 8: ch3 (counts as first dc), dc in next dc fpdc in next 4 sts, *dc in next st, dc2tog over next 2 sts, fpdc in next 4 sts, dc in next 2 sts, fpdc in next 4 sts*, rep from * to * around, ending with fpdc in next 4 sts. Join with sl st in first st. - 24 sts, 2 pattern repeats

row 9: ch3 (counts as first dc), dc in next st, *fpdc in next 4 sts, dc in next 2 sts*, rep from * to * around, ending with fpdc in next 4 sts. Join with sl st in first st. - 24 sts, 4 pattern repeats

row 10: ch2 (counts as first hdc), hdc around, join with sl st in first st. - 24 sts

row 11: ch2 (counts as first hdc), *hdc in next 4 sts, 2 hdc in next st, hdc in next 5 sts, 2hdc in next st*, rep from * to * around, hdc in last 3 sts. Join with sl st in first st. - 28 sts, 2 pattern repeats

row 12: ch2 (counts as first hdc), hdc around, join with sl st in first st. - 28 sts

row 13: ch2 (counts as first hdc) *hdc in next 5 st, 2 hdc in next st, hdc in next 3 sts, 2 hdc in next st*, rep from * to *, ending with hdc in 5 sts, 2 hdc in next st, hdc in last st. Join with sl st in first st. - 33 sts, 2 pattern repeats

row 14-16: ch2 (counts as first hdc), hdc around, join with sl st in first st. - 33 sts

row 17: ch2 (counts as first hdc), *hdc in next 4 sts, 2 hdc in next st, hdc in next 5 sts, 2hdc in next st*, rep from * to * around, ending with hdc in last 5 sts. Join with sl st in first st. - 38 sts, 2 pattern repeats

row 18-20: ch2 (counts as first hdc), hdc around, join with sl st in first st. - 38 sts

row 21: ch2 (counts as first hdc) *hdc in next 7 st, 2 hdc in next st, hdc in next 3 sts, 2 hdc in next st*, rep from * to *, ending with hdc in 5 sts. Join with sl st in first st. - 43 sts, 2 pattern repeats

row 22: ch2 (counts as first hdc), hdc in next 20 sts, ch5, sk next 8 sts, hdc around, join with sl st in first st. 40 sts including ch5, 43 sts including skipped 8 sts.

row 23: ch2 (counts as first hdc), hdc in next 20 sts, hdc in each of ch5, hdc around, join with sl st in first st. 40 sts

rows 24-26: ch3 (counts as first dc), dc in next 3 sts, fpdc in next 4 sts, *dc in next 4 sts, fpdc in next 4 sts*, rep from * to * around, ending with fpdc in last 4 sts. Join with sl st in first st. - 40 sts – 4 pattern repeats

row 27: ch3 (counts as first dc), dc in next 3 sts, fpdc in next 4 sts, *dc in next st, dc2tog over next 2 sts, dc in next st, fpdc in next 4 sts, dc in next 4 dc, fpdc in next 4 sts*, rep from * to around to ending with fpdc in last 4 sts. Join with sl st in first st. - 38 sts – 2 pattern repeats

row 28: ch3 (counts as first dc), dc in next st, dc2tog in next 2 sts, fpdc in next 4 sts, *dc in next 3 sts, fpdc in next 4 sts, dc in next st, dc2tog over next 2 sts, dc in next st, fpdc in next 4 sts*, rep from * to around to ending with fpdc in last 4 sts. Join with sl st in first st. - 35 sts – 2 pattern repeats

Fasten off and weave in ends. Block to desired measurements.

Copyright 2009 Ellie Thouret
For personal use only.

Saturday, 21 November 2009

New Moon - Alice Mitts

I saw New Moon last night after what has felt like a lifetime of waiting! It was a great film and I can't wait to see it again. As with Twilight, Alice's wardrobe was completely inspiring (except for a coat malfunction during the trip to Italy). There are a few patterns on Ravely already for her pretty fingerless mittens but all are knitting, so I made it my mission today to figure out a look-a-like crochet version.

Here are some pics - the pattern will be available as soon as I've had it tested for any snafus!

Ellie's Alice-Inspired Mitts


Sunday, 11 October 2009

Baking

So I finally got the Hummingbird Bakery Cookbook, which I've been after for ages, and at the same time I got Rachel Allen's Bake. They arrived this week and I wanted to test a couple of recipes, so I chose the Black Bottom Cupcakes from HBC and Oat and Vanilla Cookies from Bake.

The recipes in both books were really easy to follow and I started off with the cupcakes. They are really rich chocolate cupcakes with a dollop of cheesecake mixture on top.

Here's a picture of the page in the book, depicting what they are supposed to look like:


And here are my finished cupcakes:


As you can see, they do not remotely resemble the picture, however they are still pretty tasty. I'm hoping that a lot of photoshopping and food-teasing was involved to take the original picture.

First I mixed all the ingredients for the chocolate part in my old, Freecycled fod mixer. The colour was this delicious brown and it smelled great.


The mixture was really thick and gloopy, I think because no eggs were called for. It was hard to get it into the cupcake cups and I was very tempted to eat it raw out of the bowl!

After that I made the cheesecake mixture and I think this is maybe where things went wrong. The mixtue was really runny, even though I used the amount of liquid (eggs) called for in the recipe. I think in future I would use more cream cheese to thicken the mixture up a little.


They taste really rich and dense, especially the chocolate part, and I think I would make some modifications if I make these again. Since the cheesecake part was a bit runny it went crumbly in the oven.

While the cakes were baking I made the cookies. This was really easy but I added quite a bit of water to the mixture as it wasn't forming the dough well enough with the dry ingredients. After a while cooling in the fridge, I baked the (tiny) cookies, which grew a little in the oven to resemble this:


No photo comparison for this one but let me tell you that they do not look like the picture! Somehow Rachel Allen managed to make hers perfectly round which I found impossible! They taste good though and will be coming to work with me tomorrow.

I love these two books and can't wait to make more from them. Guy is making fondue in squash from Bake tonight, to have with smoked salmon and potato wedges, I can't wait!

Wednesday, 12 August 2009

Scarves and more scarves

It's been a while since my last post since we haven't had the Internet at home for a bit. To fill the time, I've been making a few scarves (it is August but the weather is awful here - 13 degrees this morning!). Excuse the photos, I don't seem to be able to take pictures of objects!

1. Queen Anne Scarf

I actually made this one back in April but only just got around to taking a picture of it.


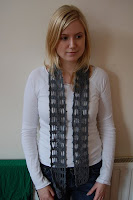
2. Mirror Lake Scarf

This was a free pattern on Ravelry and I used two strands of Colourmart Extrafine Merino held together. I used two different colours for a tweedy effect.


3. Luna Lovegood Scarf


Another free Ravelry pattern! Although the most simple, I think this is actually my favourite scarf of the bunch. It was super-quick to crochet and the only thing I don't love is the yarn - it is Sirdar Wash n Wear which is a bit of an icky nylon!


In other news: my lovely sister-in-law to be has given me a subscription to Interweave Crochet for my birthday (which was last week). Yay! I can't wait to receive my first issue, I am sure it will be very inspiring!

Also, there are only just over three weeks until our wedding now and we're getting excited! Most of all I am looking forward to going on holiday to Amalfi, Italy. I hope we'll finally have some nice weather!

Thursday, 16 July 2009

Harry Potter

Not a very original title, but we went to see HP and the Half-Blood Prince last night. I was a bit in the dark, because although I've read all the books and seen the films, I had forgotten what happened in the last one. Nevertheless it was really good, very well-done and much darker than the previous ones, while retaining the funny parts to make sure it was not too serious for a younger audience.

The film opened with Harry in a cafe attempting to chat up a waitress, a good nod to the fact that the cast and characters are growing up. Although the acting of the main characters has vastly improved since the first film, I still cringed at a few various points where responses seemed a bit stilted or overdone.

The cinematography was amazing as always, with swooping views of Hogwarts and nicely-done CGI (this made me laugh when I thought about the early days of CGI and how things have moved on since then!). I felt a bit cheated that more was not made of the story of the Half Blood Prince, as I think this could have been really interesting, but obviously some things had to be cut down to make the film a manageable length.

One thing I really loved in the film was the amazing array of handknitted items on show! I absolutely covet Hermione's grey knitted hat (and have queued this pattern on Ravelry ready for when my knitting skills improve), and there were also some great scarves and jumpers. I would also love to try to make Luna's lion hat which made everyone laugh out loud, but think that might be a bit of a stretch!

Other things happening this week:

- We are in negotiations to buy a new house (exciting and scary!)
- Going to Leamington Spa this weekend for a friend's birthday (exciting!)
- Found a blog by my favourite graphic artist - new compelling reading! Lucy Knisley

Monday, 13 July 2009

Finished shawl...at last

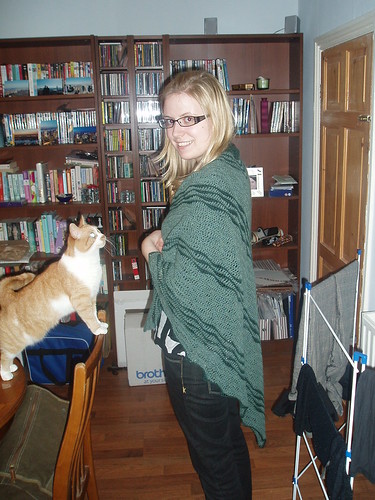
Just a quick post to say I finally finished the shawl I was crocheting for my stepmum's birthday. I can safely post about it now as my parents went to Italy today. I hope she likes it! Here are a couple of (bad) photos:

Pancakes likes the shawl (and anything made of wool)!

I also made a hat which only took a couple of days, as an antidote to the shawl.

Sunday, 21 June 2009

First sewing venture and Etsy

I haven't written in a while as I've been very tired after Guy's sister's fantastic wedding last weekend. However, I have been quietly working away on my top-secret present for my stepmum's birthday and have made quite a bit of progress this week!

Yesterday I decided to venture into sewing (more than just a bag lining) by making a little purse for a friend's birthday. I got the pattern from this book - Sew Fabulous Fabrics - and it was really easy to make. I had some fabric from I-don't-know-when so I used it with some fusible interfacing and all in all it only took about an hour to make. The trickiest bit was sewing on the popper (I sewed it on the wrong way round) and the little button.

Here are some pictures of the finished object:


I love the little button which I found in my mum's old button box. There are some great buttons in there, including stars and lions!

To put in the purse, I bought some handmade earrings from this shop on Etsy.com. I absolutely love her jewellery and have also bought 3 pairs of earrings and a ring for me! The items are gorgeous, very reasonably-priced and the shipping rates are great too, even fto the UK. Hope my friend likes her present!

Sunday, 7 June 2009

Reupholstering chairs

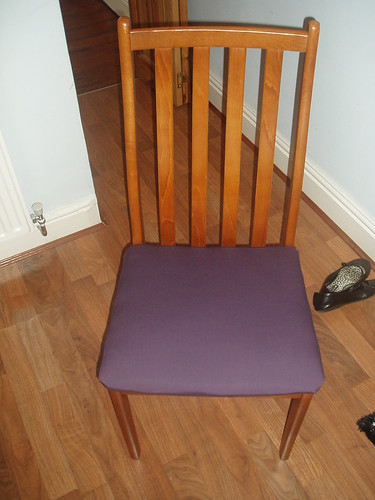
This weekend we went to John Lewis to do our wedding gift list, and I visited their haberdashery department for the first time. The shop near us has a great haberdashery with lots of different yarns, threads and great fabric. I have been meaning to reupholster our dining room chairs almost since we got them from a kind person through Freecycle, and this was the perfect excuse to get some great fabric.

I got two meters of purple cotton to cover 6 chairs, and actually it was only slightly too much. I also got a staple gun (getting the right staples was a nightmare involving visitng Hobbycraft and Paperchase just before closing time).

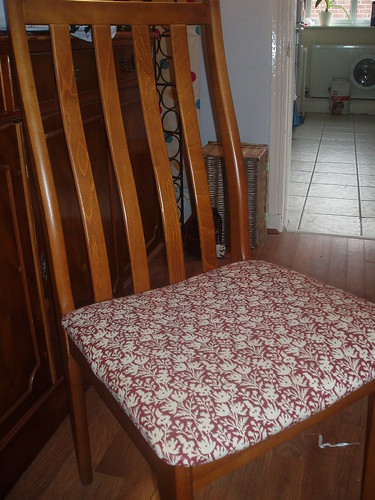
All I did to cover the chairs was unscrew the seat covers, take off one of the existing pieces of fabris, cut a square of new fabric the same size and staple it over the existing cover. It was really easy but quite time-consuming and tiring to do. Anyway, I think it ended up looking really good and fits great with our dining room decor.

BEFORE: stained, old-fashioned fabric that doesn't go with our decor!


AFTER: Lovely new purple fabric that fits in perfectly


I like this fabric so much that I'm thinking about making a tablecloth to go with the seat covers. Not sure how easy this will be so I'll have to investigate it!

Thursday, 4 June 2009

The excitement of a new sewing machine AND a new blog

I decided to start this blog to document my ever-growing obsession with crafts, in particular crocheting, sewing, knitting and jewellery-making. My love affair with crochet started at Christmas 2008 when my fiance's sister showed me all the fantastic things she'd been making. After a bit of a halting start I managed to pick it up using Debbie Stoller's Stitch N Bitch Crochet which is a great book. So far I've made hats, scarves, bags, gloves, a purse and I am currently working on a large project for a present.

Knitting quickly followed crocheting, although I haven't picked that up as easily and it's been put aside for the time being. I also re-discovered sewing and pulled out my grandmother's old sewing machine to find it only does one stitch.

Which brings me to yesterday: after spending quite a while searching for a new sewing machine that wouldn't break my (very small) budget but that had all the features I would need for a good couple of years, I finally found the perfect one on eBay. It's a Brother XL220 (can't find the link) and it is an 'A Grade' which means it has either been opened and returned or has had a slight manufacturing fault that has been repaired. It arrived yesterday and I set it up as soon as I got home from work, and it is fantastic! So easy to use, even comes with a needle threader, and I managed to easily line my latest Fat Bottomed Bag with only a couple of mishaps (caused by me, not the machine). Can't wait to receive the two books I've ordered: Sew U and S.E.W. and begin sewing some clothes!
Related Posts with Thumbnails